Navigation
Lanayru Twilight
Great Hylian Bridge cutscene text
When Link first arrives at the Great Hylian Bridge, the cutscene that plays before Link can jump off the bridge is typically skippable. However, advancing the text box as early as possible (double frame perfect: A on the first frame that will fill the text box, B on the next frame) makes it impossible to skip the cutscene for some reason. This is true whether regardless of whether Link is wolf or human and regardless of whether he's coming from Lanayru gate clip or the intended path. However, because the text doesn't need to be advanced at all to skip the cutscene, this timeloss is easily averted by only pressing start to skip the cutscene and not touching the A and B buttons.
Kargarok Battle
Kargarok Skip
Discovered by LogitechSDAZ
After triggering the kargarok cutscene, dash toward the Zora spirits, getting Link far enough away for the kargarok to start flying around. Return to the coast near the kargarok, transform human and wait near the water. Once the kargarok is becoming visible over the hill, swim into the water and put on the iron boots to sink to the ground. It is useful to walk diagonally away from the kargarok after sinking. When the kargarok tries to follow Link into the water, it will kill the bulblin while failing to grab Link, and the fight will end. This is about 6-8 seconds faster than the quick fight.
After killing the bulblin this way, Link will start the kargarok flight as human instead of wolf. It is recommended to transform into wolf as soon as possible during the flight because human Link spawns on an out of bounds ledge, which causes the camera to go crazy as the kargarok flies. Also, touching the control stick before transforming will cause Link to fall off of the ledge, and it is then impossible to transform while Link is falling.
WARNING: If the kargarok grabs human Link deep enough in the water to kill the bulblin rider, the game will crash. It is not possible to recover from being grabbed, but it is possible to input the soft reset combo (start + X + B) as soon as Link is grabbed and soft reset before the game crashes.
Kargarok quick fight
After skipping the cutscene to start the fight, dash far enough away from the kargarok for it to begin flying around. Afterward, get on the slope and wait for the kargarok to get close to the ground. Jump on and attack. After getting off, backflip once, then jump attack back onto the kargarok. Kill the bulblin with a Midna charge once possible.
WARNING: If the second attack on the kargarok knocks the bulblin off into the water, the game will softlock. This is not a concern for the quick fight, as it is done up on the hill, but it can be relevant when backing up failing the quick fight.
Faster kargarok flight
Discovered by Dragonbane
Easier clip found by NitroPlay
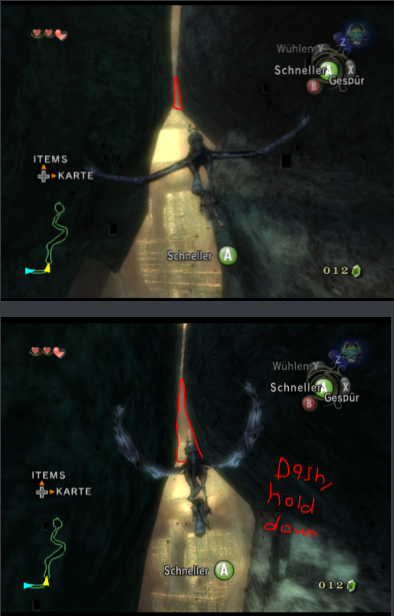
Clipping out of bounds makes the kargarok flight faster by making the path to the load zone straighter. This saves around 6s.
Images By JDLinkMaster
Here are some visual cues to help with the easier clip. Flying to the right will help give the same angle as in the pictures.

It is also possible to clip out of bounds earlier in the tunnel. For getting to UZR, this is slower than the later clip and more difficult if transforming from human to wolf during the flight, but it is useful for Iza 1 Skip.
Kargarok OoB flight path comparison
Flying to the loading zone OoB is slightly faster than clipping back in bounds.
Rutela Cutscene Skip
Discovered by LogitechSDAZ
Optimization by Adam H
Once at Death Mountain ready to warp the meteor to Zora's Domain, dash behind the chained rock and transform into human before the meteor falling cutscene. Then, warp the meteor to Zora's Domain as human. There is a 1-frame window where a sidehop to the right will skip the Midna text. After the sidehop, hold down-right and put on the boots to go under the arch; otherwise, hold down and roll to get to the arch, then use the boots. Exiting under the arch skips the trigger for Rutela cutscene.
During the twilight, after collecting the tear in Zora's Domain, the trigger is still present and will need to be skipped again to save time. This time, though, the next destination is the upper right hand ledge. To avoid being swept all the way down the waterfall, either perform Waterfall Sidehop (below, faster) or hold L and right to line up as far right as possible without getting stuck on the archway, then put on the boots after passing the archway. Walk out to the side pool before taking off the boots to get out.
Castle Town Portal Skip with Ending Blow Moon Boots
This is useful for Low%. Lure the twilit bulblin all the way to the bridge to Castle Town. Avoid the middle of the arena, where the fight will activate; doing so is not precise. Get the twilit bulblin roughly in the position shown in the video, then do an iron boots roll or stab to knock it down. Get in the corner shown, then perform Ending Blow Moon Boots (2f window to force unequip boots) to escape the arena. The twilit bulblin will die if hit three times with Master Sword slashes or the iron boots.
Castle Town Bug
The Hyrule Castle Town bug is only vulnerable after it goes down from the ledge. With specific movement when breaking the boxes, you can manipulate it to do so immediately
Waterfall Sidehop
Discovered by Venick
After doing Rutela Skip during Lanayru Twilight, it is faster (but harder) to sidehop to the right at the edge of the waterfall instead of going all the way around and dropping down from above. This sidehop is possible on 6 frames: Sidehopping on the later 3 (frames 4-6) will put Link on the higher (ideal) ledge, while the first 3 (frames 1-3) will put Link on a lower ledge from which he can clawshot to the vines on the higher ledge. Failing to sidehop within this 6-frame window will result in Link following all the way down the waterfall, at which point savewarping will place him up near the load zone to inner Zora's Domain and is the fastest backup.
- Open up the item menu as soon as the A button appears on bottom of the screen. If the route calls for an equip here, do so. (It is also possible to do the trick unbuffered.)
- Hold L + Right and close the item menu.
- Swim until Link arrives at the edge of the waterfall after 4 swimming strokes.
- Soon after Link hits the ground underwater, sidehop right. A good visual cue for this is Link's right arm extending out for the 4th time, or the B button on the HUD reaching the end of the wall on the right side of the screen.
- Transform wolf and Midna jump up to the bug.
Safe Method
Discovered by Unknown_Pigeon
There is a safer alternative for waterfall sidehop that is ~2.5s slower. After crossing the arch, equip the boots, and then unequip once you land on the ground. Equipping and unequipping the boots are not precise. The window for the sidehop is 6-7 frames, with none of the working frames resulting in a sidehop that fails to reach the upper ledge. This means that mashing for the sidehop A press is viable.
Lilypad bug movement
Image by Simikins
A guide for movement between TP's lilypads in Lanayru Twilight

Faster kargarok bugs
First bug later discovered by SVA16162
Higher route credit to gymnast86
Final bug bonk kill by Habreno
It is 0.86s faster to hug the left wall at the start and skip killing the first bug as it will catch up later as shown in the video below.
It is also faster to fly above the rocks and hug the wall rather than underneath as the path is shorter. This was discovered by gymnast86 while creating the Any% TAS.
Finally, it is also possible to bonk off the inner wall with the same dash used to kill the final bug. This is risky, as the amount of time it takes for Link to finish collecting the tear is variable, and it is possible for Link to fall into the water before fully collecting the tear, necessitating redoing the entire kargarok flight.
Boss bug fast fight
Discovered by Dragonbane0
When the boss bug is swimming around Link in the water, it will swim until its timer runs out but will only attack if it is on camera. Thus, it is possible to manipulate the bug to attack from an advantageous direction by entering first person while facing that direction.
For cycle 1/3, wait for the bug to finish attacking, then jump attack and bite it as intended.
As soon as possible move Link to the opposite short edge of the plank as shown in the video and enter first person. This will manipulate the bug to approach Link head-on.
When the bug comes charging, backflip twice, hesitate to wait out the bug's attack, then jump attack. If done correctly, this will hit the bug as soon as its attack ends, causing it to hang in place momentarily.
While the bug is hanging in place, jump attack it once more to latch on and bite it for cycle 2/3. It is common for the bug to be partially clipped into the plank while hanging in place, and if Link tries to latch onto it while it's clipped, then he will bounce off. If needed, delay this jump attack until the bug is no longer clipped into the plank, but don't delay so long that the bug gets away.
For cycle 3/3, repeat steps 2-4.
Once the bug is upside down in the water, Midna charge from right next to one of its upper legs so that the attack will propel Link into the water after hitting one leg. This will finish the fight more quickly than if Link successfully attacks all 6 legs.
Stepping stones movement
Saves 0.4s but is much riskier. Can be used in Twilight or for getting to the poe in 100%.
Howling stone LJA (obsolete)
An old 100% route (Fixed EMS) entered Lanayru Twilight from the normal entrance and then used the shortcuts to get down, skipping various things including the kargarok flight. This was done by deathwarping in Iza's lodge coming from Zora's Domain. This required an LJA using the howling stone promontory to get over to the door. This LJA's target is not precise.
1-framers
There are several instances in Lanayru Twilight of single frames between cutscenes and/or text boxes where inputs can save or lose time:
- (undesirable/pointless) between the cutscene of the Zora's Domain portal forming and the camera panning down before the Midna text - a B attack costs no time, but a jump attack costs 15 frames
- between the cutscene of warping the meteor to Zora's Domain and Midna's text - as human, sidehop right to skip the text
- between howling at the UZR howling stone and the map opening automatically - can sidehop left (useful if about to open the UZR portal, but not useful if crossing the river for the bug)
- notably, there is no frame for input between Midna's text and the Midna jump becoming available when ascending the snow/ice platforms after first entering Zora's Domain


